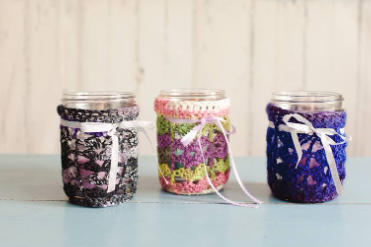
Shell Stitch Candle Holders
I found a crochet pattern online that I just had to try. The first couple that I made I followed her pattern exactly. They turned out good but I adjusted the pattern. Here is what I did.
I think I have tried this with about every weight of yarn. I started making them with Sugar N Cream 4 ply Worsted yarn. (the yarn that I use to make dish towels or pot holders) I used this because I wanted to use the candles outside and I thought they would hold up to Portland, Oregon weather. They have withstood very well for outdoor use. They are a bit bulkier because of the thickness of the yarn. I also used spaghetti sauce jars. I like the height of the jars for outdoor use because it protects the flame from the wind. (Last picture below)
My next set of candles I actually went out and purchased Kerr Wide Mouth Pint jars. The first set that I made we used for my sister's 25th wedding anniversary party. We sat them on the tables as the centerpiece. They turned out to be a huge hit.
This set that I am making now I ended up using Vanna's Glamour Sapphire yarn (2 Fine) Blue candle on the left. It has sparkles running throughout the yarn that twinkle with the flame. I am also testing out Bernat Handicrafter Crochet thread to see if I like the light weight thread instead of the yarn. Purple and green candle pictured on right. I can not decide which I like the best. I think choosing the yarn will have to be up to the crafter. If you are comfortable using a small hook (1.75mm) then the thread instead of the yarn might be the best choice for you.

Let's get started. This pattern is for using the Kerr Wide Mouth Pint jars. The pattern is in 8 stitch counts.
Abbreviations:
ch = chain
sl st = slip stitch,
sc = single crochet,
dc = double crochet,
tr = treble crochet,
The bottom:
Make a magic ring. I personally cannot do the magic ring. I do 5 ch and close it. Works great for me.
Round 1. ch 3 (counts as dc), 9 dc in ring, join with sl st into 3rd ch. (total 10 dc).
Round 2. ch 3 (counts as dc), 1 dc in the same stitch, make 2 dc in each stitch around, join with sl st into 3rd ch (total 20 dc).
Round 3. ch 3 (counts as dc), 1 dc in the same stitch, make 2 dc in each stitch around, join with sl st into 3rd ch (total 40 dc).
Round 4. ch 3 (counts as dc), 1 dc in every stitch around, join with sl st into 3rd ch (total 40 dc).
Round 5. repeat round 4. (You want the bottom completely covered. Depending on the weight of yarn that you use will determine how many times you repeat step 4. You must remain at the count of 40 stitches.)
The body:
The body design is a shell stitch. See photo. Basically it is ch 4 (counts as a triple) skip 3 stitches (in the 4th stitch) put 3 triple crochets , chain 1, put 3 more triples in the same stitch. skip 3 stitches (in the 4th stitch) put 1 triple crochet. Repeat around 4 times. Join with sl st into 4th ch. (makes 5 sets of the shell stitch)
Repeat the shell stitch around 5 rows.

To finish off the top. ch 6 (counts as dc and ch 3), single crochet in space between shell group, ch 3, double crochet into the single triple, repeat, join with sl st into 3rd ch. (You do this to level out the top)
This next part confused me at first and I am not sure if I can explain it so you can understand it but here it goes.
Next round: chain 3 (counts as dc), put 3 double crochets on the chain three in the row below, put a double in the top of the shell. put 3 double crochets on the chain three from the row below, put a double right above the single triple. Repeat.
Last row: ch 3, dc in each stitch.
Depending on which yarn you use decides how many shell rows are needed to cover the jar. Notice that when I used the crochet thread I had 7 rows of the shell stitches.


- Hits: 769
